
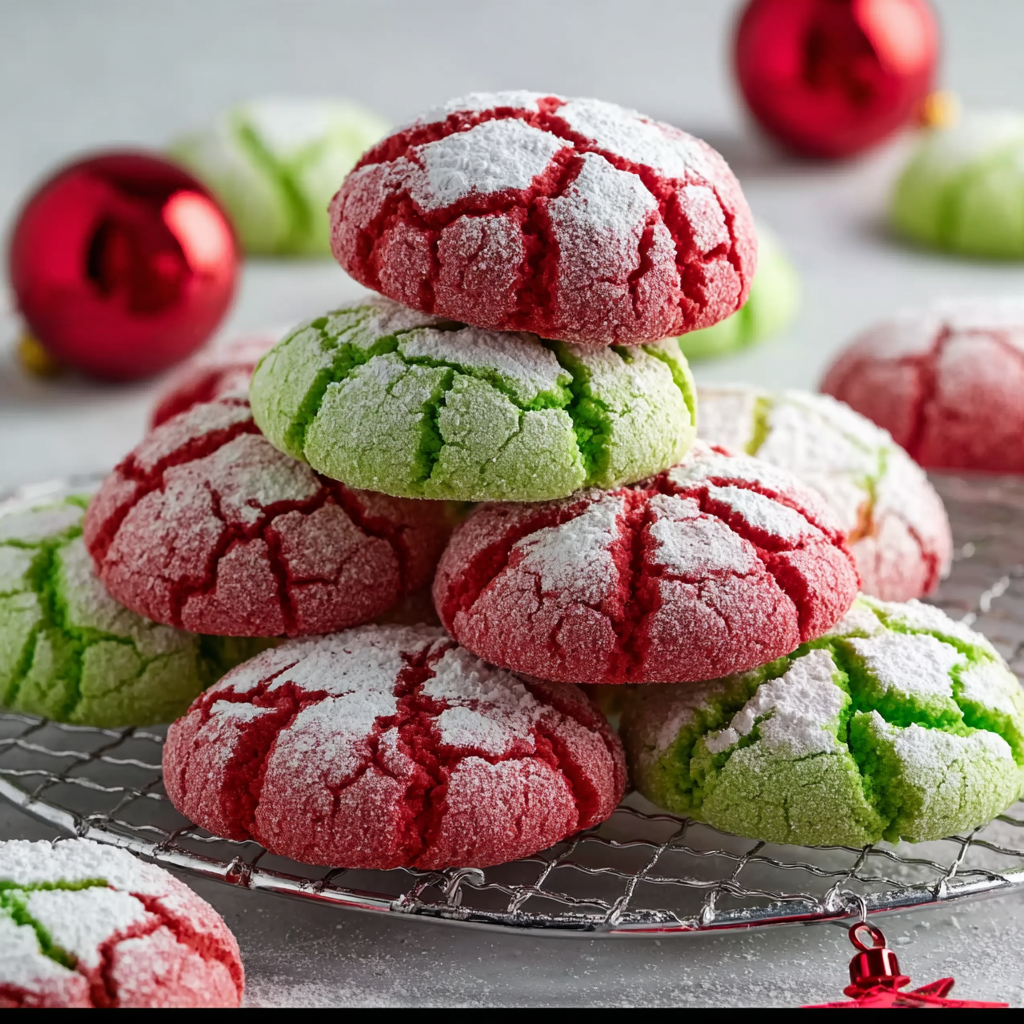
Festive Red and Green Crinkle Cookies

Bright red and green crinkle cookies made from white cake mix for a quick, festive treat that bakes soft centers and crinkled edges.
Why You'll Love This Recipe
- Speedy preparation that produces a festive result in about one hour including chilling and baking time; perfect for last minute baking when guests arrive.
- Uses one standard box of white cake mix and pantry staples so you can bake without a grocery run; a great use for on hand baking mixes such as a name brand white cake mix.
- Gel food coloring creates bright, even color without altering dough consistency the way liquid colors can; perfect for bold red and green shades.
- Soft centers and crinkled tops are consistent every time thanks to a chilled dough that holds its shape while still spreading slightly for that classic look.
- Make ahead friendly and freezer stable; you can freeze unbaked dough balls or fully baked cookies for easy entertaining and gift giving.
- Kid friendly mixing and rolling steps make this an excellent activity for family baking days where helpers can assist with shaping and coating.
I have gifted these cookies every holiday since that first weekend when I was short on time. Family members always comment on how they look professional but taste homely and comforting. Seeing the bright colors on a vintage cookie tin never fails to bring smiles to my table and to neighbors who receive a small stack as part of our annual cookie swap.
Ingredients
- White cake mix: Use a standard 13.25 ounce box of white cake mix for the best texture and neutral flavor. A well known store brand or national brand such as Pillsbury or Duncan Hines works well and often includes the right balance of sugar and leavening.
- Eggs: Two large eggs provide structure and moisture. Bring them to room temperature for more even mixing and a softer final crumb.
- Vegetable oil: One third cup of neutral oil keeps the cookie tender and helps spread; canola or light olive oil work fine for a neutral flavor.
- Powdered sugar for coating: One third cup for initial coating and generous dusting; sift if clumpy to get an even snow like crust.
- Gel food coloring: Red and green gel paste colorings give vibrant hue without thinning the dough. Look for brands sold in small tubes at supermarkets or specialty baking shops.
Instructions
Combine dry mix and wet ingredients: In a large mixing bowl whisk together the white cake mix, two large eggs, and one third cup vegetable oil until the batter comes together into a smooth, thick dough. The dough should be pliable and slightly tacky but not runny. If the dough seems loose, chill briefly to firm it up before shaping. Divide and color: Scoop the dough onto a work surface and divide it evenly into two bowls. Add red gel coloring to one bowl and green gel coloring to the other. Start with a small amount of gel and knead with a silicone spatula or gloved hands until the color is uniform. Add more gel in tiny amounts if you need a deeper shade. Gel color spreads without adding liquid so the dough should remain the same consistency. Chill to firm: Cover each bowl with plastic wrap and refrigerate for thirty minutes. Chilling firms the dough which helps the balls hold shape and develop the signature surface crackle when baked. The cold dough also prevents excessive spreading and keeps centers soft. Preheat and prepare pans: Preheat the oven to three hundred seventy five degrees F one hundred ninety degrees C and line a baking sheet with parchment paper or a silicone baking mat. Arrange racks so the sheets bake in the center of the oven for even browning. Use an oven thermometer if you want to verify actual oven temperature. Scoop, roll, and coat: Scoop one tablespoon portions of dough and roll each between your palms into a smooth ball. Roll each ball generously in powdered sugar until fully coated. The powder creates the contrast that produces dramatic crinkles as the cookie expands in the oven. Place dough balls about two inches apart on the prepared sheet. Bake and cool: Bake for nine to eleven minutes until the cookies display crinkled tops and are set around the edges. Do not overbake as the centers should remain soft. Let the cookies rest on the sheet for two to three minutes then transfer to a wire rack to cool completely before storing or stacking.
You Must Know
- These treats freeze very well either as unbaked dough balls or fully baked cookies for up to three months in an airtight container.
- Because a white cake mix often contains wheat and sometimes milk products these are not safe for those with gluten or egg allergies unless you choose specialized mixes.
- Gel colors are concentrated so add slowly to avoid staining hands and to achieve consistent shades.
- Cooling on a wire rack prevents the bottoms from going soggy and preserves the crisp edge texture.
One of my favorite parts about these cookies is how predictable they are. When I double the batch for a cookie swap I still get uniform crinkles and soft centers as long as I keep the dough cold and use tablespoon scoops for consistent size. The powdered sugar coating is forgiving and hides slight surface imperfections which makes them look hand crafted but professional.

Storage Tips
Store cooled cookies in an airtight container layered with parchment paper at room temperature for up to five days. For longer storage place in a freezer safe container with parchment between layers and freeze for up to three months. If you freeze unbaked dough balls arrange them on a sheet to freeze solid then transfer to a labeled zip top bag; bake from frozen adding one to two minutes to baking time. Reheat chilled cookies briefly in a low oven to refresh the exterior crispness before serving.
Ingredient Substitutions
If you need a dairy free option choose a white cake mix labeled dairy free since some mixes include milk solids. Swap vegetable oil for melted coconut oil for a hint of toastiness but expect a slight change in aroma. To make a smaller color palette substitute green with a teal or forest shade by blending blue and yellow gel. For a sugar free alternative choose a baking mix sweetened with a sugar substitute and powdered erythritol for coating, understanding texture may be slightly different.
Serving Suggestions
Arrange cookies on a festive platter with sprigs of fresh rosemary or mint for a holiday look that contrasts with the red and green. Serve alongside hot chocolate topped with whipped cream or a robust coffee to balance the sweet cake like interior. For gifting stack six to eight cookies in a clear cellophane bag with a ribbon or place them in small tins interleaved with wax paper for transport. Add a small label noting flavors and allergens for polite presentation.
Cultural Background
Crinkle style cookies appear in many baking traditions where a powdered sugar coating and expansion during baking create a dramatic cracked surface. Adapting a boxed white cake mix into cookie form is part of an American convenience baking tradition that celebrates speed and consistent results. Using seasonal colors ties these cookies to winter holiday customs where bright food colors and handmade treats are central to family gatherings and neighborhood exchanges.
Seasonal Adaptations
For winter holidays keep classic red and green but swap the green for silver or gold shimmer dust for a New Year version. At Valentine celebrations use red and pink gels and heart shaped sprinkles. For spring swap to pastel gel colors and add lemon zest to the dough for a bright citrus note. You can also fold in a tablespoon of cocoa powder to part of the dough to create a chocolate contrast between the colored batches.
Meal Prep Tips
To prepare ahead scoop all tablespoon dough balls and place them on a lined tray to freeze solid, then bag and label. On baking day simply remove the number you need and place on a prepared sheet straight from the freezer adding one to two minutes to the bake time. This method lets you serve freshly baked cookies with minimal last minute effort. Keep a small container of powdered sugar nearby for a quick refresh dusting before serving.
These festive red and green crinkle cookies bring color, ease, and nostalgic texture to the holidays. They are an ideal quick bake for busy hosts who still want to offer something homemade and memorable. Try a batch this season and make the recipe your own by adjusting color, coatings, or small flavor additions.
Pro Tips
Chill the colored dough for at least thirty minutes to prevent excessive spread and to encourage dramatic surface crinkles.
Use tablespoon scoops for uniform cookie size and consistent baking times.
Roll the dough balls generously in powdered sugar so the contrast between sugar and dough yields pronounced crinkle patterns.
If using gloves when coloring dough you prevent strong staining on hands and keep color distribution even.
Line baking sheets with parchment or a silicone mat to ensure even browning and easy cleanup.
This nourishing festive red and green crinkle cookies recipe is sure to be a staple in your kitchen. Enjoy every moist, high protein slice — it is perfect for breakfast or as a wholesome snack any time.
FAQs about Recipes
Can I freeze the dough?
Yes you can freeze unbaked dough balls. Arrange them on a baking sheet to freeze solid then transfer to a freezer safe bag. Bake from frozen adding one to two minutes to the bake time.
Which food coloring should I use?
Use gel paste food coloring for the most vibrant hues without changing dough texture. Start with a small amount and add more until you reach the desired color.
My cookies seem underbaked in the center what should I do?
If the centers seem underbaked after the recommended time you can return the cookies for an additional minute or two. Watch closely to avoid overbaking which will dry them out.
Tags
Festive Red and Green Crinkle Cookies
This Festive Red and Green Crinkle Cookies recipe makes perfectly juicy, tender, and flavorful steak every time! Serve with potatoes and a side salad for an unforgettable dinner in under 30 minutes.
Ingredients
Main
Instructions
Combine dry mix and wet ingredients
Put the white cake mix, two large eggs, and one third cup vegetable oil into a large mixing bowl. Stir until the mixture forms a smooth thick dough that is pliable but not runny. If the dough seems too loose chill briefly to firm it up.
Divide and color
Split the dough evenly into two bowls. Add red gel paste to one bowl and green gel paste to the other. Mix each until color is uniform starting with a small amount and adding more as needed to reach desired intensity.
Chill the dough
Cover each bowl with plastic wrap and refrigerate for thirty minutes so the dough firms. Chilling helps the balls hold shape which produces the best crinkled surface during baking.
Preheat oven and prepare pan
Preheat the oven to three hundred seventy five degrees F one hundred ninety degrees C. Line a baking sheet with parchment paper or a silicone mat to prevent sticking and to ensure even browning.
Shape and coat
Scoop one tablespoon portions and roll into smooth balls between your palms. Roll each ball thoroughly in powdered sugar until fully coated and place on the prepared sheet about two inches apart.
Bake and cool
Bake for nine to eleven minutes until the tops are crinkled and edges are set. Allow cookies to rest on the sheet for two to three minutes then transfer to a wire rack to cool completely before storing.
Last Step: Please leave a rating and comment letting us know how you liked this recipe! This helps our business to thrive and continue providing free, high-quality recipes for you.
Nutrition
Did You Make This?
Leave a comment & rating below or tag
@snapyrecipe on social media!
Categories:
You might also like...

5-Minute Thanksgiving Appetizers That Wow Every Guest
A fast, elegant bite for Thanksgiving: creamy cheese, bright cranberry, crunchy pecans and rosemary on crackers or baguette — ready in five minutes and loved by all.

Air Fryer Bang Bang Chicken Skewers
Crispy air-fried chicken skewers tossed in a creamy, sweet-spicy bang bang sauce — a quick, crowd-pleasing weeknight favorite.

Air Fryer Honey Butter Garlic Chicken Tenders
Crispy air-fried chicken tenders coated in a sticky honey-butter garlic glaze — quick, family-friendly, and ready in about 25 minutes.
Did You Make This?
Leave a comment & rating below or tag @snapyrecipe on social media!
Rate This Recipe
Share This Recipe
Enjoyed this recipe? Share it with friends and family, and don't forget to leave a review!
Comments (1)
This recipe looks amazing! Can't wait to try it.
Comments are stored locally in your browser. Server comments are displayed alongside your local comments.
Hi, I'm Natalia!
What's Popular

Get My 30-Minute Meals email series!
Quick and easy dinner ideas delivered to your inbox.