
Old-Fashioned Banana Pudding

A creamy, nostalgic banana pudding layered with vanilla wafers, ripe bananas and a silky cream-cheese pudding — an easy make-ahead dessert perfect for gatherings.

This banana pudding has been a go-to for every family gathering and potluck I’ve hosted for years. I first put this combination together on a humid summer evening when ripe bananas lined my counter and I wanted something cool, sweet and effortless. The combination of smooth cream cheese, sweetened condensed milk and instant vanilla pudding creates a rich, velvety filling that tastes indulgent but comes together in minutes. With layers of crisp vanilla wafers and tender banana rounds, each spoonful hits a nostalgic mix of texture and flavor that always brings people back for seconds.
I remember the first time I made this for my extended family — my uncle asked for the recipe, my kids declared it their favorite dessert, and guests were sneaking extra spoons while no one was looking. It’s the kind of recipe that transforms pantry staples and a few ripe bananas into something celebratory. The flavors are familiar: the tang from cream cheese, the sweet density of condensed milk, the bright vanilla of pudding mix and the faint crunch of wafers that soften just enough after chilling. Because it requires no baking and minimal active time, it’s my emergency party dessert and a warm-weather favorite.
Why You'll Love This Recipe
- Ready quickly with just about 20 minutes of hands-on prep, then chilled for an hour — perfect when you need a fast dessert that still feels special.
- Uses pantry staples: instant pudding, sweetened condensed milk and vanilla wafers, so you can pull it together even without a full shopping trip.
- Layering creates contrast: creamy pudding filling plus tender banana rounds and the residual crispness of the wafers for texture balance.
- Make-ahead friendly: assemble, chill and serve later — flavors deepen and the dessert slices and serves beautifully the next day.
- Flexible for crowds: scale up or down easily and substitute whipped topping or homemade cream to control richness.
- Kid-approved and nostalgic; it’s the kind of comfort dessert that triggers fond memories and simple pleasure.
Personal note: the first time I doubled the recipe for a summer cookout I forgot one casserole in the fridge overnight and the wafers softened into pillows of sweet vanilla that everyone raved about. My sister now insists on extra banana slices on top for presentation, and my kids request a smaller bowl made the day after because the flavors mingle beautifully with time.
Ingredients
- Cream cheese (8 ounces): Use full-fat, block-style cream cheese softened to room temperature for the silkiest texture; brands like Philadelphia give the most consistent flavor and body.
- Sweetened condensed milk (14-ounce can): This lends sweetness and body without cooking; buy a standard 14 oz can and refrigerate after opening if you have leftovers.
- Vanilla instant pudding mix (1 box, 4-serving size): Provides the vanilla backbone and quick-set structure — use the instant type, not cook-and-serve.
- Cold whole milk (2 cups): Whole milk gives the best mouthfeel; you can swap 2% for a lighter version but the filling will be less rich.
- Whipped cream or whipped topping (12 ounces): Use homemade whipped cream for a fresh flavor or thawed Cool Whip for convenience; fold gently to retain air.
- Bananas (6–8 medium): Choose ripe but not overly brown bananas — firm fruit sliced into 1/2-inch rounds holds its shape and balances sweetness.
- Vanilla wafers (8–10 ounces): Keebler or Nabisco-style wafers work well; use a full 8–10 oz package to form two layers in a 9" x 13" dish.
Instructions
Whip the cream-cheese base: Place the softened cream cheese and the sweetened condensed milk in a large mixing bowl. Using an electric mixer on medium speed, beat until completely smooth and glossy, about 2–3 minutes. Scrape the bowl once so there are no lumps — a uniform base ensures an even final texture. Prepare the instant pudding: In a separate bowl, whisk the vanilla instant pudding mix with the 2 cups of cold milk until fully combined and slightly thickened, about 1–2 minutes. The mixture will begin to set; give it a minute off the mixer to reach a custard-like thickness. Fold in whipped cream: Gently fold the whipped cream (or thawed Cool Whip) into the cream-cheese mixture with a rubber spatula using sweeping motions to preserve air. Incorporating the whipped cream first keeps the filling light before the denser pudding is added. Combine pudding and cream base: Fold the prepared pudding into the cream-cheese-whipped mixture until just combined. Work carefully to avoid deflating the air; the finished mixture should be creamy, slightly thick, and spreadable. Assemble the first layer: Line the bottom of a 9" x 13" casserole with a single layer of vanilla wafers, breaking a few to fill gaps. Arrange a layer of banana slices (about 1/2" rounds) over the wafers so each bite will have fruit. Spread the filling: Spoon about half of the pudding mixture over the banana-wafter layer and spread evenly with an offset spatula to the edges, pressing gently so the filling makes contact with the wafers and bananas. Repeat layers: Add a second layer of vanilla wafers and banana slices, then spread the remaining pudding mixture over the top. Smooth the surface, cover tightly with plastic wrap, and refrigerate. Chill and finish: Chill for at least 1 hour to allow the pudding to set and the wafers to soften slightly. Before serving, optionally top with crushed wafers or extra banana slices for garnish.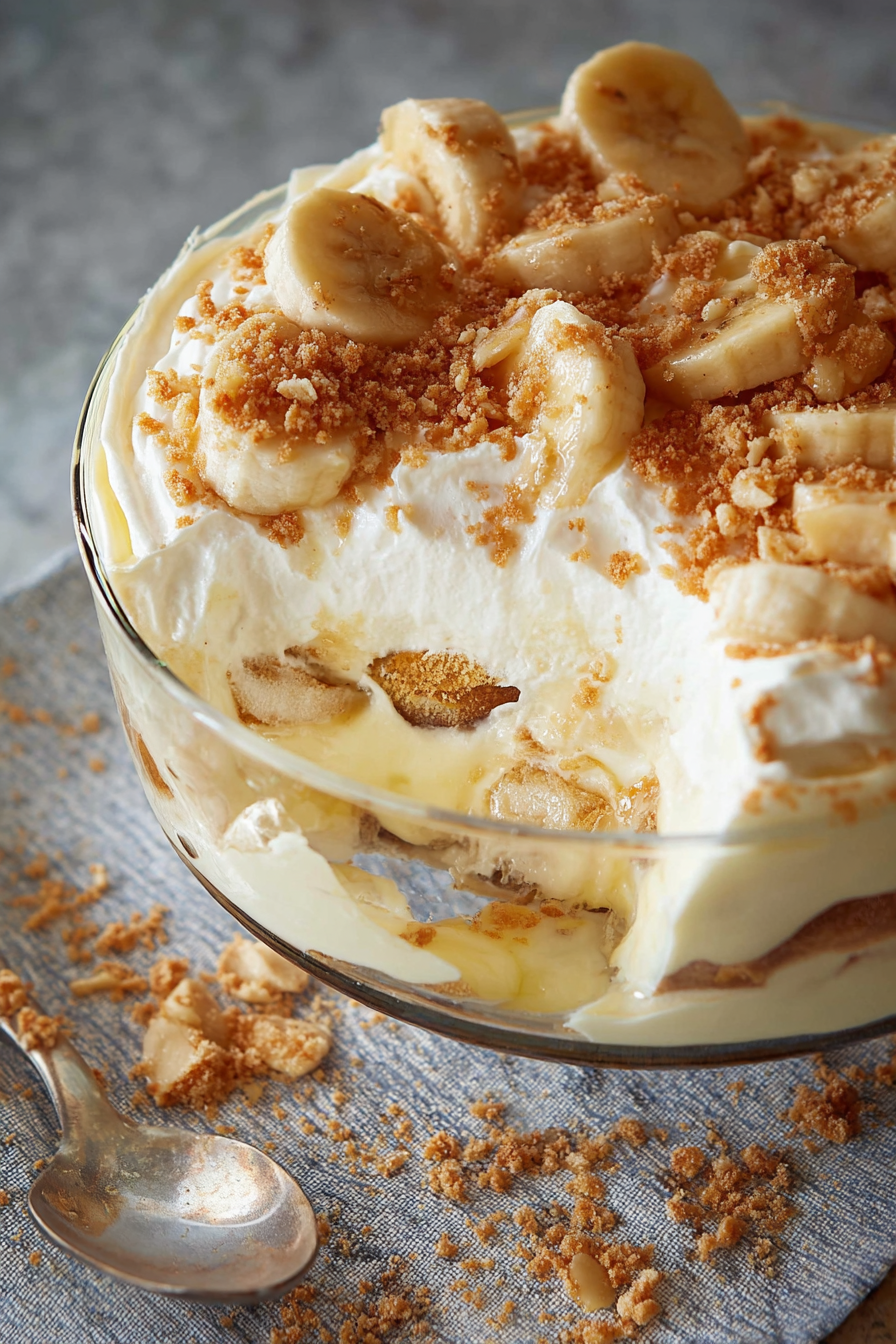
You Must Know
- This dessert stores well in the refrigerator for up to 3 days; the wafers will continue to soften over time, which many people prefer for a spoonable pudding texture.
- It freezes poorly because the bananas and whipped topping change texture; avoid freezing assembled portions unless you don’t mind a mashed banana texture after thawing.
- High in calcium and sugar — it’s a rich treat best enjoyed in moderation or on special occasions.
- To prevent browning on banana slices used as a garnish, toss them briefly in a little lemon juice before arranging on top.
My favorite aspect is how the simple act of layering elevates basic ingredients into a nostalgic centerpiece. I’ve watched this version become a requested contribution at summer potlucks because it’s quick to make, easy to transport when chilled, and pleases both adults and children. Over the years I’ve learned that little additions — a sprinkle of crushed wafers or a few extra banana rounds — make it feel more homemade and thoughtful.

Storage Tips
Store the assembled dish tightly covered in the refrigerator for up to 3 days. Use an airtight container or press a layer of plastic wrap directly onto the pudding surface to prevent absorption of other fridge odors. If you plan to serve later the same day, refrigerate for at least 1 hour. For best presentation, add any decorative banana slices or crushed wafers right before serving. Do not freeze the assembled pudding — the texture of the bananas and the whipped component degrade noticeably when thawed.
Ingredient Substitutions
If you want a lighter version, swap the cream cheese for Neufchâtel (reduced-fat cream cheese) and use 2% milk. For a dairy-free variation, use a non-dairy cream cheese and coconut-based whipped topping, but note the flavor will be coconut-forward. If you prefer a stronger vanilla note, replace one cup of milk with half-and-half when making the pudding to heighten richness. For gluten-free, choose gluten-free vanilla wafer cookies; texture will be similar but look for crisp cookies that soften at the same rate.
Serving Suggestions
Serve chilled in shallow bowls or straight from the casserole; for gatherings, spoon into individual glasses or mason jars for pretty single-serve portions. Garnish with crushed vanilla wafers, banana coins, a light dusting of cinnamon or a few toasted pecan pieces for crunch. Pair slices with strong coffee or a sparkling dessert wine. For summer gatherings, place chilled bowls on ice to keep them cool outdoors.
Cultural Background
Layered banana-and-cookie desserts have long roots in American Southern kitchens, where sweetened condensed milk and instant pudding became pantry staples in the mid-20th century. This layered preparation echoes classic Southern banana puddings but streamlines assembly with instant pudding and whipped topping for convenience. The combination of soft fruit, creamy filling and wafer cookie was popularized at church suppers and family reunions and has become synonymous with comfort and hospitality.
Seasonal Adaptations
In summer, choose the ripest bananas for the sweetest flavor and add lemon-zest accents to the filling for brightness. In cooler months, fold a pinch of cinnamon or nutmeg into the pudding for warm spice, or swap some of the vanilla wafers for sandwich cookies with a hint of spice to echo seasonal flavors. For holiday gatherings, top with toasted chopped nuts and a few salted caramel drizzles to add a festive touch.
Meal Prep Tips
Prepare the cream-cheese-pudding mixture a day ahead and store covered in the refrigerator. Slice bananas and layer them just before assembly to avoid excessive browning. If you need portable servings, assemble individual parfaits in sealable jars and chill; they travel well if kept cool. Use shallow, wide containers rather than very deep ones for more even chilling and easier serving.
This recipe is a simple, dependable dessert that rewards minimal effort with maximum nostalgia and comfort — invite friends, bring a spoon and enjoy how quickly it disappears.
Pro Tips
Soften cream cheese to room temperature for a lump-free base and faster mixing.
Fold whipped cream gently to retain air — use wide strokes and scrape the bowl instead of vigorous beating.
Toss garnish banana slices in a little lemon juice to prevent browning just before serving.
If you prefer firmer layers, assemble and serve within 1–2 hours; longer chilling yields softer wafers.
This nourishing old-fashioned banana pudding recipe is sure to be a staple in your kitchen. Enjoy every moist, high protein slice — it is perfect for breakfast or as a wholesome snack any time.
FAQs about Recipes
How long should I chill the pudding before serving?
Chill for at least 1 hour; for best texture chill 2–3 hours. The wafers will soften over time.
What type of bananas should I use and can I prepare them ahead?
Use ripe but firm bananas. If making ahead, add sliced bananas right before serving to minimize browning.
Tags
Old-Fashioned Banana Pudding
This Old-Fashioned Banana Pudding recipe makes perfectly juicy, tender, and flavorful steak every time! Serve with potatoes and a side salad for an unforgettable dinner in under 30 minutes.
Instructions
Whip cream-cheese base
Beat softened cream cheese with sweetened condensed milk until smooth and lump-free, about 2–3 minutes with an electric mixer.
Mix pudding
Whisk the vanilla instant pudding mix with 2 cups cold milk until thickened, about 1–2 minutes; allow to rest briefly.
Fold whipped cream
Gently fold whipped cream into the cream-cheese mixture with a spatula to preserve air and create a light base.
Combine fillings
Fold the prepared pudding into the cream-cheese-whipped mixture until uniform and spreadable, taking care not to overmix.
Layer wafers and bananas
Arrange a single layer of vanilla wafers in a 9x13 dish and top with a layer of 1/2-inch banana slices.
Spread half the filling
Spread about half of the pudding mixture over the first wafers and banana layer, smoothing to the edges.
Repeat layers and chill
Add another layer of wafers and bananas, spread remaining filling, cover, and refrigerate at least 1 hour to set.
Garnish and serve
Before serving, optionally top with crushed wafers or additional banana slices; serve chilled.
Last Step: Please leave a rating and comment letting us know how you liked this recipe! This helps our business to thrive and continue providing free, high-quality recipes for you.
Nutrition
Did You Make This?
Leave a comment & rating below or tag
@snapyrecipe on social media!
Categories:
You might also like...
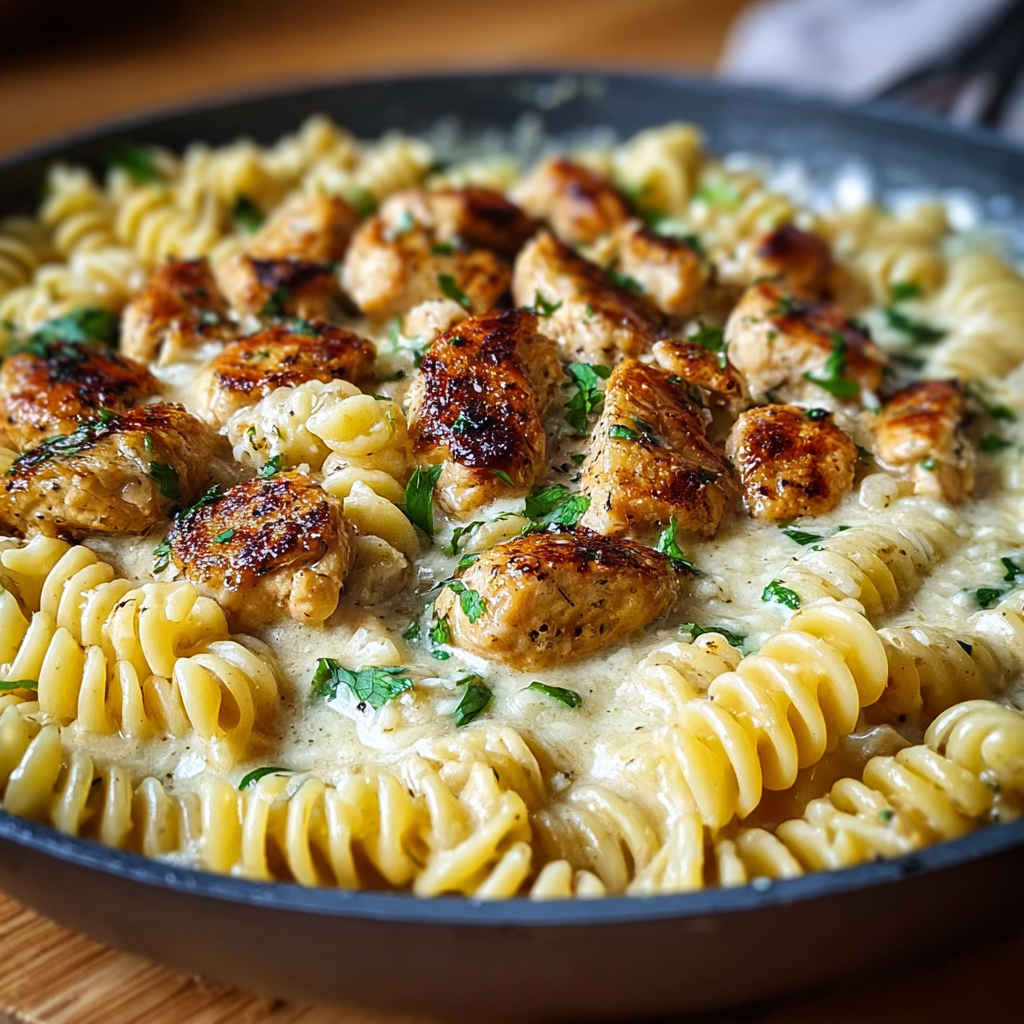
Creamy Garlic Butter Chicken & Rotini in Parmesan Sauce
Golden-browned chicken tossed with rotini in a silky garlic Parmesan sauce—comforting, quick, and perfect for weeknight dinners.
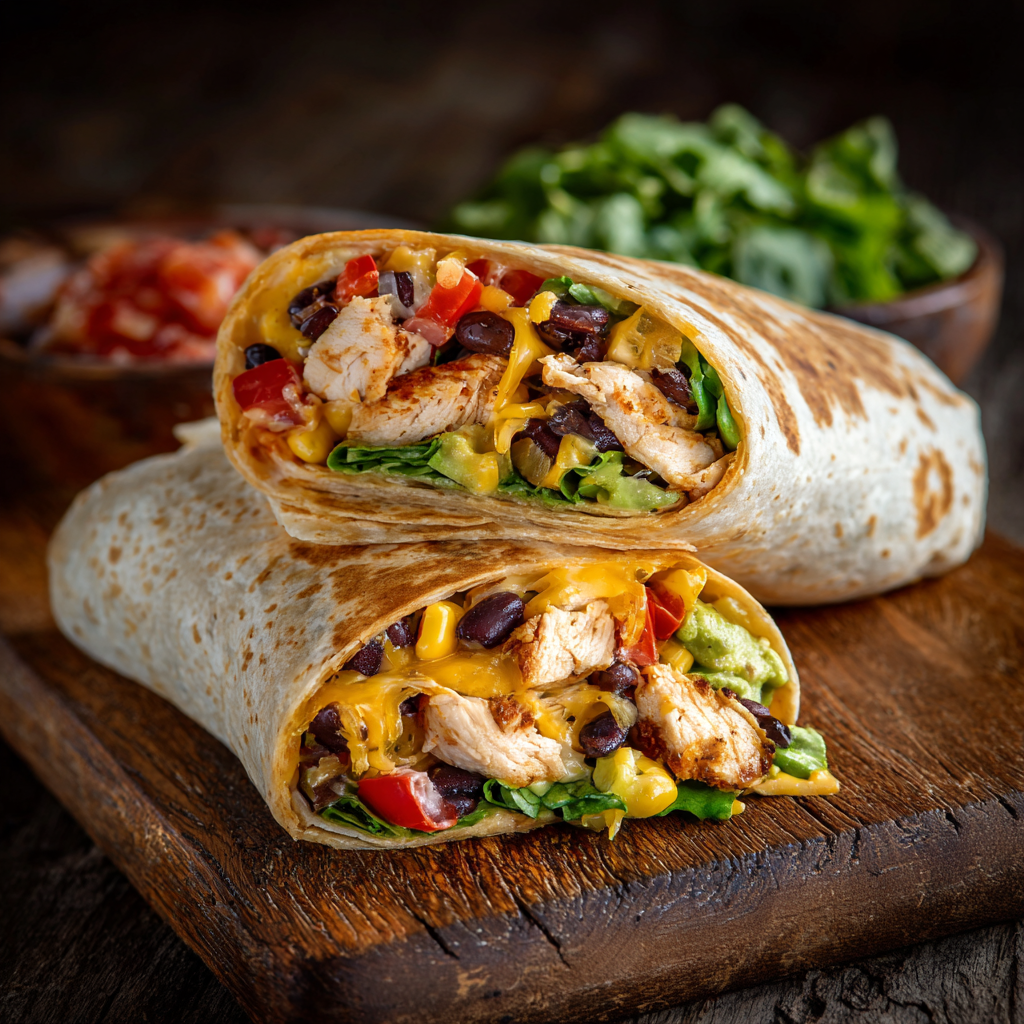
Southwest Chicken Wrap
A vibrant, smoky Southwest chicken wrap loaded with rice, beans, corn, and a creamy chipotle-lime sauce — perfect for lunch, meal prep, or an easy weeknight.

Classic Apple Crumble
A timeless apple crumble with a buttery, cinnamon-scented topping and tart-sweet Granny Smith filling — perfect warm with vanilla ice cream.
Did You Make This?
Leave a comment & rating below or tag @snapyrecipe on social media!
Rate This Recipe
Share This Recipe
Enjoyed this recipe? Share it with friends and family, and don't forget to leave a review!
Comments (1)
This recipe looks amazing! Can't wait to try it.
Comments are stored locally in your browser. Server comments are displayed alongside your local comments.
Hi, I'm Natalia!
What's Popular

Get My 30-Minute Meals email series!
Quick and easy dinner ideas delivered to your inbox.